Monday, 25 November 2013

Tapestry picture - Guatemalan dogs


I was given a book a number of years ago with South American traditional images in it, this one really stood out to me, the colours are so intense and I liked the pattern, so here started my foray into tapestry... its the only wool tapestry piece that I've made... it was good fun but I needed strong fingers to pull the wool through the fabric...  I also ended up with a finished piece that was a rhombus shape rather than a square but my magic framer managed to stretch it out so that it doesn't look too bad mounted (thanks Nigel).

(The other thing I realised when I'd finished was that I had effectively created a picture of dogs sniffing each others bums....lol!!)

Monday, 18 November 2013

Mini Owl Key Ring

Its not always about coming up with your own ideas... and sometimes I find it really nice to buy a kit some somewhere and have a little dabble.  I travel a lot (overseas) with my work and having a kit is a great way to keep your hands busy and mind from wandering on the lonely nights!  I bought this cute one from a lovely shop called Friday's Child on the Isle of Arran, the instructions and all the bits (including a needle) came with it.  It was created by Beth Connors a felt maker and teacher based in Harrogate and I think the finished piece is very cute!


Sunday, 17 November 2013

Felt bag


More felted items, so this one was a piece that I created as a practise using the hand carders and embellisher machine.  I found some nice wool pieces and textured wool.  Hand stitching and couched threads finished the surface off (see close ups below).  Then I finished it off by making it into a bag with handles from Fred Aldous on line shop.


Sunday, 10 November 2013

Covered books

Book Cover: The finished piece...


These make really handy gifts and can be reused by inserting a new book.  They are relatively easy to make.  You will need to spend some time creating the cover... so the fabric that you want to wrap your book in.  There are several ways to make this part and its up to you to get creative and design your cover.  The one I'm showing you here was created using strips of fabric attached to prefabricated felt with bondaweb, I then used a transfer printing technique to add the colours, then ribbons and hand stitching, beads and hand made discs (from tomato paste tubes) along with handmade cord to act as a fastener. The instructions below are to guide you once you have your fabric made as to how to make it into a book...

Instructions to make one:

What you'll need:
  • Book
  • Decorated piece to make the outer cover instructions not included below)
  • Pre-fabricated felt
  • Cord / ribbon for tie and bookmark
  • Cutting mat & cutter or scissors and tape measure
  • Sewing machine & needles & threads
  • Scissors 

What to do:
1)  Measure your book, the diameter around the middle and the length of the cover, add half an inch to the measurements, as follows for the seam allowance:


My book measures  13.25 inches round by 9.5 inches long (includes seam allowance).

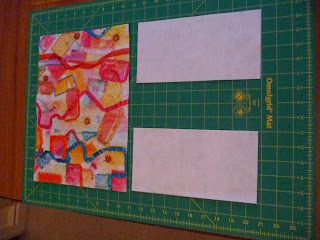
2)  Next cut your decorated piece to the size you've measured above, as follows, you might want to run a narrow short zigzag stich on the machine round the edge of the whole piece to ensure no bits fall off and it doesn't fray!


3)  Now decide how deep you want your felted inside pockets to be and cut two pieces of felt to that size, for this book mine were 9.5 inches long by 5 inches wide, so now you should have the following bits cut...


4)  You will need to make some cord to act as a tie round the middle.  There are several ways to do this, the one on my finished book is made from ribbons twisted together and run through the sewing machine on a narrow zig-zag several times.


Now take your cord and have a play as to how you want to attach it before you launch in with the sewing machine.  Fold your cover in half and decide how long you want the cord, how many times you want it to wrap around the book or how big a bow you want on the front... attach to the middle of the back of the cover with a pin, make sure your happy with the length and positioning, then sew a short 1-2 inch length zigzag on your machine to keep the cord in place at the spine of the book, ties off and hide loose ends.

5)  You can also make a book mark(if you want)  in the same way as describes above for the cord or for any left over front cover bits you might have, it can be attached in the same way as the fastener cord bur from the middle of the top of the spine.

6)  Now pin on the felt to the back side of the cover, at the edges so you have an uncovered strip in the middle.  If you have one use a quarter inch foot on the sewing machine (or use the guides on your machine) and sew all the way round the whole outside edge of the book cover and felt. Cut off any excess felt (if sometimes moves a bit when your sewing around the edge. Tie, secure and cut off any loose ends. 

7)  Now put the book inside its cover, wrap the cord around and ta dah your finished cover...

Enjoy!

--

Here's some more I made earlier...


Sunday, 3 November 2013

Cotton Shopping Bag


I was lucky enough to get given a cotton cloth bag when I brought some goodies from one of my favourite gift shops in Conwy called The Secret Garden (http://www.secretg.co.uk/).  The bag is so useful and I always have in in my handbag ready to put some things in when I'm in a supermarket or the like.  In Wales we now have to pay for plastic bags so these are becoming really useful to have.  Use any fabric you like, use oddments so you have the front and back different, or odd handles, go for it!
Instructions to make one:

What you'll need:
  • Cotton fabric 2 bits (one piece for front and one piece for back both measuring approximately 40cm by 45cm this size includes the seam allowance), plus another two bits that measure 9cm by 40cm each for the handles, these don't need to match so don't stress if you have oddments!
  • Measuring tape
  • Scissors / cutter and mat
  • Sewing machine, thread, needle etc
  • Buttons (if you want to make it look fancy...) 
What to do:

1)  Iron the fabric to remove any creases then, measure and cut the fabric in the measurements as follows:
  • 2 pieces 40cm x 45cm (includes the seam allowance)
  • 2 pieces 9cm x 40cm (includes seam allowance)
If you want to make your bag smaller or larger or handle shorter or longer then tweak the measurements and see what works for you...


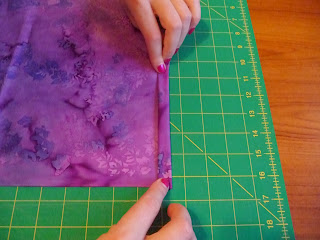
2) Take the front and back pieces and fold over the top twice (about 1cm) like the images below and pin in place...


3) Next take the pieces for the handles and fold them as indicated in the pictures below...


4) Now sew down the hems you've made on the 2 handles and the top part of the bag.

5)  Decide where you want your handles to be positioned. Tuck them under the seam (as shown below) and pin in place.


6)  Now sew your handle in place securely, I recommend that you do a cross like in the image below. Tidy off any loose ends by tying knots and threading them through the fabric then trimming.


7)  Lay your two pieces face together with the handles directly on top of each other (at this stage don't worry of the front and back don't match up, just trim off any excess material) pin in place and sew down the sides and along the bottom approx. 1/4 inch from the edge. I also suggest that you zig-zag down the outside of your seam so as to minimise fraying.


8)  Turn your bag the right way round, tidy off any loose threads securely, add any buttons or embellishments you like and ta dah, one handy shopper!
 
Enjoy!