Tuesday, 29 October 2013

Decorated Box (using a tomato paste tube)


Little brown box from Hobby craft...


Tomato paste tube


Ta Dah: The finished article and decorated box

Instructions to make one:

What you'll need:
  • Papier mache box with 'frame aperture lid' like these:
  • Paint to decorate it - I used anything acrylic or oil based as it goes on quicker
  • Paint brush
  • Measuring tape / ruler
  • Tomato paste tube (one will be plenty for this)
  • Machine Embroidery thread
  • Sewing machine & metallic needle
  • Scissors (ones you don't mind blunting)
  • Hi Tack Craft Glue
  • Embossing tool, like this (or you could use a ball point pen that has no ink in it):


What to do:

1)  IMPORTANT: For this step use scissors you don't mind blunting AND be careful as the edges will be sharp! Cut both ends off your tomato paste tube and slice open so you have one sheet.  Wash off the paste and dry.

2) As you can see from my finished box picture (above) I inlaid 4 squares of embossed tube that were sown together in the middle, I will take you through the steps for what I did, you don't have to follow these you can free style as you like!  So measure the aperture of the box lid and work out what size you want you 4 pieces to be then cut them out from the tomato paste tube (using the blunt scissors minding you don't cut yourself!).

3) Next use the embossing tool to draw wavy lines or a pattern of your choice on your pre cut squares.  If you want the pattern to be raised upwards on your finished piece then draw on the coloured side of the tube (ie where the label is), if you want is to be depressed when you look at it drawn on the shiny copper side.  You may want to have a practise on some spare tube before you launch into your finished piece.

4) Now set up your sewing machine.  Use a metallic thread needle.  Set it up to do wide but narrow in length zig zag.  Practise on a piece of cloth so you are happy with the desired effect.  I would suggest having the same thread on the top as is on the bobbin below.  You want to line your first 2 squares next to each other with no overlap.  Be warned the machine bangs and clatters around when sewing through the paste tube but it will work... be brave and sew them together, if there's gaps between your stitches then go back over what you have done.  Don't stall the machine too much otherwise you may end up with a big hole in  the tube (its not as forgiving as fabric).  Next line up the other two and repeat.  Then line the two next to each other and sew them together so you have the four.

5) I recommend that you paint your box and lid next.

6) Then place the embossed sewn tube into the aperture, securing with the high tack glue, leave to dry and Bob's your uncle, a completed decorated box!

Monday, 21 October 2013

Organza Bags


Organza Bags, fully customisable in colour and size and look great with an evening dress!
 

These are great and really simple to make...

Instructions to make one:

What you'll need:
  • Organza say 3-5 different colours (these are overlain, so that when you cut thorough different colours will show, so choose ones that go well together), size depends on what size you want your bag to be, but don't skimp!
  • Embroidery threads, any coordinating colours (machine and hand stitching required)
  • Beads (if you want, any colours / sizes, use your imagination)
  • Sewing machine with needles etc...
  • Hand sewing kit
  • Embroidery scissors / scissors with fine pointy tip
  • Felt or lining fabric for lining bag - size is up to you
  • Press-stud or other such fastner  
What to do:
  1. Decide on what size you want your bag to be, we'll make the bag from one piece and fold it in half in the middle which will be the bottom of your bag, so add a little extra for seams and hems. Lay the pieces of organza on top of each other a pin.
  2. Next use your sewing machine to sew wavy lines vertically along the length of the material, leaving gaps between them, don't be accurate with it just zoom up and down.  Variegated thread works particularly well and saves you loads of time in changing the colour. Try out different stitches to make it look interesting.
  3. You can couch some threads / wool on top to add interest and texture.
  4. When your happy with the number of vertical lines take a pair of embroidery scissors to some of the lines and cut between them... not right through the fabric, take the first layer off, if you cut it upwards you will see it fray to where the stitching is, pull away the frayed parts and you will see the underneath colour, continue to do this until you are happy with the desired effect.
  5. If you accidentally cut all the way through don't worry, just lay the two pieces on top of each other and use a close zigzag to sew them back together.
  6. When your finished embellishing create a handle for your bag.  Mine were made from twisted narrow pieces of organza run through the machine on zig zag using several threads. Send it through the machine several times, twisting the piece as you go and it'll look lovely.
  7. To finish the bag I lined mine with felt, pinned the handle in position, hemmed the top and zoomed down the sides and added a prest-stud to keep it closed.
Et voila... one bespoke evening bag.

Here's a close up of my purple one:


Saturday, 19 October 2013

Decorated Jam Jars - for flowers or tea light holders


For our wedding in September 2013 I decided that I really wanted a 'homespun' feel to it. I asked friends and relations to collect jam jars for me that I cleaned up.  Firstly I soaked the labels off in hot soapy water and removed the sticky label residue with nail varnish remover. Then it was decoration time, I tried to decorate them all differently, some with lace, some with ribbon, some with bows, stick on diamante crystals, some with beaded butterflies that I made.  Some were filled with flowers (natural ones and paper ones) and some I put teal sand in the bottom and tea lights.  We were really pleased with the effect, hope you like the look of them too!
 
Here's some more pictures of them 'in use' taken by Tony Fanning Photography at our wedding...


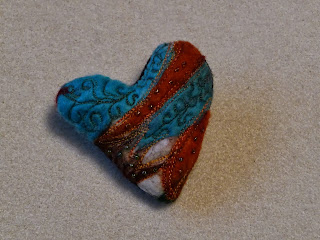
Felt Heart Brooches


These are made using and embellisher machine.  If your not sure what this is then take a look at this you tube video that shows the embellisher machine beign used...

http://www.youtube.com/watch?v=5lXLEC3dz4Q

I've decorated the top with free machine embroidery, hand stitching, beads and threads.

If you'd like more information or if you like one making for you let me know!

Friday, 18 October 2013

Autumnal banner


As Eva Cassidy's Autumn leaves song starts... The falling leaves, Drift by my window.  The falling leaves of red and gold....

I made this autumn leaves banner at a Liberty Bell Workshop, and its the time of year to getting it proudly hanging up on my staircase.   For those of you who don't know Liberty Bell, it's one of my favourite shops in Chester (England, UK).  Sue and her team put on some fantastic workshops in their well stocked back room.  She ships all her materials from the USA where she and her daughter go on sourcing trips several times each year. Her workshops are listed on her website which is well worth a browse:

http://www.liberty-bell.co.uk/

The banner is made from Liberty Bell sourced fabric backed with felt mounted on a plaited cord.

Saturday, 12 October 2013

Button necklace and Matching earrings

I was in the craft shop of a museum in Glasgow recently and saw some eye catching jewellery made with colourful buttons, so I decided to take a closer look and to see if I could have a go at making them.  I made a sketch in my notepad and then when I got back to the craft room got my button box out and had a go at making them.  I was surprised how easy it was and how effective they look.

Here's a few that I made earlier... and if you'd like to have a go at making them yourself there's some instructions below (hopefully you can follow them easily, if not drop me a line and I'll help out). The process is fairly easy and they take about 20 minutes to make a necklace.


From this....to this...

Instructions to make the necklace:

What you'll need:
  • Hemp cord (or similar)
  • Tape measure
  • Scissors
  • Beading mat (not essential but helps to stop the buttons sliding everywhere)
  • Buttons (in the colour scheme of your choice), minimum of about 40 but this depends of the length you want the necklace to be and what size your buttons are (mine are approx. 1cm across) 
What to do:

1) Colour selection... if you have a bag of mixed buttons (like I did) then have a go at firstly sub-dividing the colours then seeing which colours work well together... experiment to see what you like before you start threading, its much easier this way round!


2) Wrap the tape measure around you neck to measure what length you want your necklace, add about 10 cm to this length so your not struggling to tie knots at the 'finishing off part of the process' and cut the cord accordingly.

3) Tie a knot about 5cm from one end (any knot will do, just make sure its big enough so that when a button is threaded on it wont fall off the end!)

4) Thread your first button on to the cord, by going up through one of the button holes and then down through the next... thread it right to the end where your knot is.


5) Thread your next button on and slide it all the way along to sit neatly next to your first button, lie your necklace flat and make sure they sit together, not overlapping or with big a big gap. Continue threading buttons until you have 4 or 5 in a row then thread the end of the cord back through as many holes as it will go so that its tidy and secure.

6) Continue threading buttons on as you like, you could try stacking some buttons on top of each other (see the picture below). 


Keep going until your happy with the length of the necklace.  Hopefully you will have about 10cm of cord left to make a loop out of... if not you've probably cut the cord a bit too short and it could be tricky to get a knot in the end loop...

7) To finish make a loop that will be big enough to go over the first button and tie a knot...

Et voila.... one button necklace! Now go and put it on, and show everybody... and tell them that you made if from my blog! ;-)

Variations of the theme...
  • To make your necklace bespoke, you could... leave gaps between the buttons... tie knots between them...add beads... vary the length, enjoy experimenting!
Now to make the earrings:

What you'll need:
  • Earring backs
  • G-S Hypocement glue (or similar stuff)
  • Buttons (single or stacked)
What to do:
  • Get the button, put glue on the earring back and stick the button on the front, allow to dry thoroughly before using...(don't be too keen you don't want the earring to be a permanent feature...)


What else...
  • How about making a matching bracelet and some earrings....?
Where do I get...?


Paper & Ribbon Heart Garland Decorations

These are quick and easy to make and I think that they make beautiful decorations for a wedding event. I made several of these to hang at our wedding using the simple instructions as descried below.


Heart Garland, with thanks to Tony Fanning Photography


Instructions to make one:
 
What you'll need:
  • Strips of paper or card (A3 to get it long enough), patterned or plain
  • Ruler
  • Scissors / craft knife and cutting mat
  • Something to sting them on (ribbon / wool / string)
  • A punch - round or a shape of your choice (I used heart shaped)
  • Stapler & staples
 
What to do:
 
1)  Measure and cut the following from your paper:
Three strips of paper 5cm wide and 25cm long
Two strips of paper 5cm wide and 32cm long
Two strips of paper 5cm wide and 40cm long
Two strips of paper 5cm wide and 50cm long
 
If you want to make your hearts smaller or larger then tweak the measurements and see what works for you...

2) Now organise the strip on top of each other as follows:
On the bottom one of the 25cm strips, then add a 32cm strip, then a 40cm strip, then a 50cm strip. Then add another of the 25cm strips, and then the final 50cm strip, then the final 40cm strip, then the final 32cm strip, and end with the last 25cm strip. Make sure that all the 'bottoms' of the strips line up.

3)  Next take a tight hold of the bottom of the strips or put a single staple in.  Take hold of the pile at the bottom of the strips to hold them in place... one by one, bend each strip back until the ends all meet where your fingers are, you will slowly see that this now forms the heart shape. Keep holding tight and staple all the strips at the base (where your first staples are). What you want at the end is basically four heart shapes, within each other. Staple where needed – I found a few staples at the bottom were all that was needed, but you could also put a few further up the “stem” of the heart, to keep the shape.

4) Now punch a  hole in the top and cut a length of ribbon for the heart to hang from.  You can hang a single heart on its own, or string a load on to one long length of twine to create a lovely long garland. Or you can stack 3 together and put them on a window ledge or mantle piece to create unusual shaped decorations.

Enjoy!